

Converting Your Website into a Mobile App (WordPress Guide)
Alright, website owners, it’s time to level up your business. In this guide, we’re going to convert your WordPress website into a mobile app, because, if you’re not on mobile, you’re missing out on a massive audience.
Website2App’s WordPress plugin makes it so simple to create an app that looks and feels like your website. So, let’s dive in!
-
Step 1: Find the plugin: Hop over to your WordPress dashboard and click on the “Plugins” tab. Now, press “Add New” and then in the search plugins bar type “Website2App” and press Enter.
-
Step 2: Install and activate: Once you find the Website2App plugin, click “Install Now” and then “Activate” after the installation is complete. (If you can’t see “Activate” click on the plugins tab on the left of the page and look for Website2App in the list.
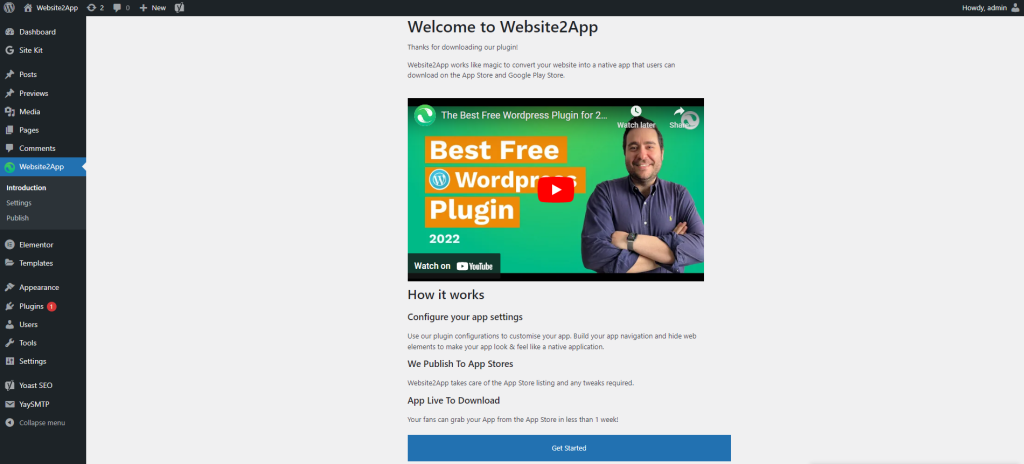
- Step 3: Now that the plugin is activated, refresh your browser and Click on Website2App on the left (like in the pic above). Clicking Website2App brings you to our intro page. Click “Get Started” to start configuring your app!

- Step 4: Hide header and footer: To make your app look sleek, click “Choose your header” to open a menu where you select which elements of your header and footer you would like to hide for the mobile app.
- When clicking on an element, you will see a red outline appear, this highlights the seelcted element. On the left hand side there are two arrows “Child” and “Parent”. Clicking these arrows will change your highlighted selection to include more/less elements in that section.
- Once all elements you want to remove are highlighted, click “Apply”. This can be done more than once if you want to hide additional elements. Repeat the steps for hiding elements in your footer, and anything else you want to hide.
- Tip: If you want to remove more elements you can click “Add another element to hide” to open a new row
- Look at the phone on the right for a live preview of your configuration!
- Step 5: Customise Your Splash Screen (Load Scren): Give your app some personality! Upload your logo and choose the colors that best represent your brand. Your app should feel like an extension of your website.
- Step 6: Set Top and Bottom navigation Style and colour. Follow the text prompts in the plugin to set the style of your top and bottom menus.
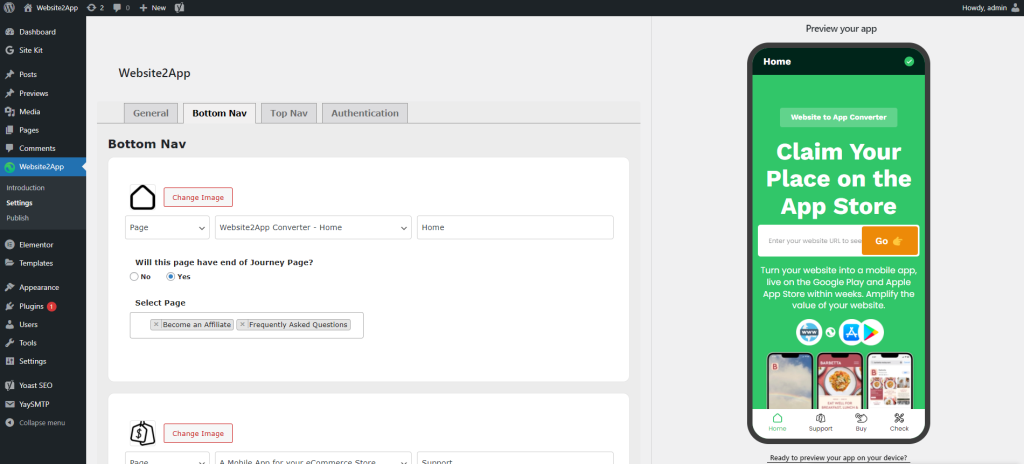
- Step 7: *NEW TAB* – Bottom Nav: Choose the bottom navigation tab from up the top of the Website2App plugin window. The page helps you select which pages from your website you would like to be accessible via icons at the bottom of your mobile app. It is recommended to have 1-5 options down the bottom navigation.
- Select “Page” from the drop-down menu to add a page from your WordPress site, “External” allows links to other websites.
- Once “Page” is selected, choose which page you would like to add from the drop-down menu.
- Set a title for the icon which will appear down the bottom of the app
- You can also select “Change Image” if you want to change the icon.
- If you want to add more icons select “Add another navigation icon” down the bottom of the page.
- The icons will appear as the colours that you set in the previous step.
- Make the pages and icons you select simple and user-friendly to make your users’ experience a breeze.
- Step 8: *NEW TAB* – Top Nav Add Top Navigation by clicking on the “Top Nav” tab. The interface is similar to the Bottom Navigation page we just configured but this time you also can set if you want the menu to be aligned to the left, middle or right up the top. You can also set what icon you want to use to open the menu (here we are using a small green dot with a tick, you can see it in the top right hand corner of the picture above). If you don’t add a picture you can select “Logo/Text on the left and hamburger menu icon on the right” this will set the standard ‘hamburger menu’ icon as the icon to open your Top Nav menu.
- Step 9: *NEW TAB* – Authentication – If you need your users to sign in before they use your app, select “Yes” and then click save. This will ensure that your users are prompted to login when they use your app.
- Step 10: Preview your app! Now that your app is configured, you can preview what it looks like from the live phone preview on the right of the page.
- Step 11: Nice work, now you are ready for the app store! Hover over “Website2App” in the WordPress navigation menu to the left of the page and select “Publish” from the dropdown menu. On the publish page, select “Pay Now” to be taken to the Stripe payment page, once payment is made the Website2App team creates an iOS + Android version of the customised app. The Website2App team will then upload both of the mobile apps to the App Store for you. If you would like to host your own mobile app, just let the team know and we can arrange that as well.
Not Using WordPress? Enter your details and the team will send you a preview of your mobile app.

Tom from Website2App
Have a Question?
Website2App will help you scale your business by converting your website into a mobile app ready for the Apple App Store and the Google Play Store.
To see a preview of your own mobile app, fill out the form above.
Have a question? Contact us at our support page and one of the team will respond.